I conducted an Introductory Workshop to LaTeX at MMU (Cyberjaya Campus) yesterday (8 March). If anyone’s interested, the workshop materials (slides, worksheet, sample code, MiKTeX installation guide) are available here.
Bibtex2html and Springerlink BibTeX converter
I found out these useful tools:
BibTeX2HTML : http://www.lri.fr/~filliatr/bibtex2html/doc/
Springerlink BibTeX converter; http://www.cs.usyd.edu.au/~niu/cgi-bin/springer.cgi
…and I wonder why on earth Springerlink did not put their BibTeX export format by default…? IEEE and ACM did that!
Latest version of geometry.sty breaks beamer
So if you updated all your packages in one go and finds that your beamer presentations don’t compile anymore, this is why. Don’t panic though (42), there’s a workaround: put the following line before \documentclass{beamer}:
\makeatletter\let\ifGm@compatii\relax\makeatother
\documentclass{beamer}
\documentclass{beamer}
Read this post for more information.
New Malaysian CTAN Mirror!
There is now finally a Malaysian CTAN mirror server at ftp://mirror.upm.edu.my/ctan/! Oh joy oh joy! Hopefully now all downloads and updates will be a breeze (M’sian network latency being what it is :p) (oh ye of little faith liantze, baaad girl!)
It’s already showed up in MikTeX’s mirror list. For TeXLive users, just point your repository to ftp://mirror.upm.edu.my/ctan/systems/texlive/tlnet/.
CMYK Output for Printing Prepress
This is the 6th and real last post in the bookdesign series. Previous posts in this series:
Happy Chinese New Year! Well traditionally CNY is celebrated up till the 15th day, so this isn’t a belated greeting. 😉
I thought my post on the front and back covers (+ISBN bar codes) was the last thing I wanted to document in the bookdesign series, but I just realised that I’d still yet to talk about producing a CMYK version if your printer is using a offset-printing process.
You can read about the CMYK colour model and how it it’s different from RGB. In a nutshell, RGB is for on-screen viewing and is more vibrant, CMYK is for commercial printing and seems more “dull”. Check with your printing service if they’re using (on-demand) laser printing or offset-printing to print your material; it may depend on the type of printing stock (i.e. the paper) you choose.
If laser printing is used, RGB is fine, and you can hand over your pdflatex-generated file over as it is. However if offset-printing is to be used, you’ll need to produce your PDF in CMYK colour model instead. Your printing service might be willing to do the conversion for you at their end; but I think it’s more efficient to do this yourself as you’ll have more control over the final PDF. It’ll also give you a more accurate idea of how your design will look in print, so you’ll have a chance of selecting your colours.
Convert all graphics files to CMYK
Any graphic files that you include (via \includegraphics, for example) must be converted to CMYK. If you have imagemagick, the quick way is
convert image_RGB.jpg -colorspace CMYK image_CMYK.jpg
But I’ve been told that the resulting PDF, when loaded into other applications e.g. Illustrator, contains the “wrong” colours. For more accurate results, you’ll need to use colour profiles as discussed here.
Invoke xcolor CMYK mode
By default, the xcolor package uses the RGB colour model. To invoke CMYK mode:
\usepackage[cmyk, …other options…]{xcolor}
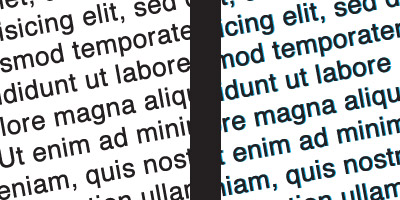
And then there’s the issue of different kinds of black. If your design contains large areas of black, and particularly if it involves light-coloured text (e.g. white) on a black background, the RGB black directly converted to CMYK would have values of C: 100% M: 100% Y: 100% K: 100% (over-saturated rich black). You then run high risks of getting unwanted “shadows” if the four colours print out of registration, as shown in the sample on the right from this excellent article:
Now the cmyk mode of the xcolor package automatically redefines the colour black to C: 0% M: 0% Y: 0% K: 100%, i.e. flat or standard black. Flat black can look rather “washed-out”, so you might want to define a different shade of black, especially for large areas of black. Check with your printing service for further advice. E.g. our printer recommended to use a “cool black” C: 30% M: 0% Y: 0% K: 100% for the covers of our Grid Computing Cluster book. Unfortunately I couldn’t figure out how to do it previously, but now I do:
\usepackage[cmyk, …other options…]{xcolor}
%% cmyk values have range [0,1]
\definecolor{CoolBlack}{cmyk}{.3,0,0,1}
%% In case you want to redefine the basic black
%% (0,0,0,1) across the board. Check with your
%% printer if this is advisable!!
\definecolor{black}{cmyk}{.4,.3,.3,1}
%% Force the new black into effect, because
%% xcolor issues \color{black} with the old
%% black before all its initialisations.
\color{black}
In other words, you should always liaise with your printing service concerning the technical specs. You’ll thank them for their expert advice, and you’ll learn a lot about graphics design and the printing process as well.
OK that’s it! That’s truly the last of the bookdesign series. I hope you’ve enjoyed it as much as I did.
Front and Back Covers (and ISBN Bar Codes)
This is the 5th and last second last post in the bookdesign series. Previous posts in this series:
Sorry this post is so late after the last one, it was hard finding time to write between work and a toddler. We’re drawing to a close for this bookdesign series now… just as we’re starting a new year.
I’m not very imaginative, nor am I a graphic designer. So for my book cover, I go for a huge title across the top, a background illustration, and author/editor and publisher information at the bottom. Yes, very boring, but playing it safe — I think with a careful choice of fonts, colours and illustration, the end result wouldn’t look too bad at all. 🙂 I personally find the wallpaper package very handy for the cover page. So it might go something like this:
%% No header nor footer on the cover
\thispagestyle{empty}
\thispagestyle{empty}
%% Cover illustration
\ThisLLCornerWallPaper{1}{grapes-in-my-studio-little-too-much-dust}
%% Bar across the top
\tikz[remember picture,overlay]%
\node[fill=Sienna,text=white,font=\LARGE\bfseries,
text=Cornsilk,minimum width=\paperwidth,
minimum height=5em,anchor=north]%
at (current page.north){Exercises in \LaTeX};
\vspace*{2\baselineskip}
{\bfseries\itshape\color{LightGoldenrod!50!Gold}
\fontsize{36pt}{46pt}\selectfont
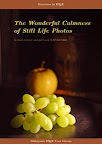
The Wonderful Calmness\par
of Still Life Photos\par}
\vspace*{2\baselineskip}
{\LARGE\color{LightGoldenrod}
A small dummy example book by
\scshape{Curutari}\par
}
\tikz[remember picture,overlay]%
\node[fill=Sienna,font=\LARGE\bfseries,
text=Cornsilk,minimum width=\paperwidth,
minimum height=3em,anchor=south]%
at (current page.south) {Malaysian \LaTeX\ User Group};
\begin{center}
\LARGE\bfseries\color{SaddleBrown!30!black}
\end{center}
%% Clear to next odd page
\cleardoublepage
Then comes the back cover. Now if the book is published with an ISBN, you’d want to put a bar code for it. I was wondering where I could get a free bar code generator, when a gut instinct told me to look around CTAN for a LaTeX solution. And sure enough, the ean13isbn package does the trick without any hassle:
%% In preamble
\usepackage[ISBN=978-80-85955-35-4]{ean13isbn}
\usepackage[ISBN=978-80-85955-35-4]{ean13isbn}
…
%% Print the ISBN bar code
%% See the documentation for other sizes e.g. SC0, SC1…
\EANisbn[SC4]
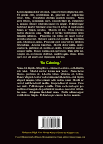
So here’s the code for my backcover:
%% Temporarily enlarge this page to push
%% down the bottom margin
\enlargethispage{3\baselineskip}
\thispagestyle{empty}
\pagecolor[HTML]{0E0407}
%% down the bottom margin
\enlargethispage{3\baselineskip}
\thispagestyle{empty}
\pagecolor[HTML]{0E0407}
\begin{center}
\begin{minipage}{.8\textwidth}
\color{Cornsilk}\Large\bfseries
\lipsum[1]
\begin{center}
\huge\bfseries\sffamily\color{lime}`So Calming.’
\end{center}
\lipsum[2]
\end{minipage}
\end{center}
\vspace*{\stretch{1}}
\begin{center}
\colorbox{white}{\EANisbn[SC4]}
\vspace*{\baselineskip}
\textbf{\textcolor{LightGoldenrod!50!Gold}{Malaysian \LaTeX\ User Group \textbullet\ \texttt{http://latex-my.blogspot.com}}}
\textbf{\textcolor{LightGoldenrod}{Cover Illustration by Dusan Bicanski \textbullet\ \texttt{http://www.public-domain-image.com}}}
\end{center}
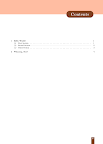
I’ve also added a table of contents with a simple \tableofcontents. The ToC heading is printed as a chapter heading, so I created a fancy style for it, without the chapter number and background picture, by modifying our fancy chapter code from earlier.
All in all, here’s what our sample book now looks like (empty pages omitted):

Download links of the LaTeX code producing the above:
Illustrations courtesy of PublicDomainImage.com here, here and here; OpenClipart Project here.
Epilogue
Well it’s been fun writing this series. It sure took me some time to prepare the sample code, search for appropriate illustrations and write up the posts, but I’m glad I documented how I achieved some of the effects in that Grid Computing Cluster book. Many thanks to all the readers and especially those who kept the comments section lively. You sure motivated me to finish writing this series! 😀
MikTeX 2.8 and WinEdt 5.6
Apparently WinEdt 5.6 needs some adjustments to work with MikTeX 2.8. Here are the instructions to make them work nice together (including on Windows 7), from Yu-Sung Su’s blog.
Customising running headers and footers
This is the 4th post in the bookdesign series. Previous posts in this series:
By default, the running headers in a two-sided book (resp. article) produced by LaTeX displays the chapter (resp. section) number + title and the page number on even pages; and the page number and section (resp. subsection) number + title on odd pages. On chapter pages, however, the running header is blank, and the page number is displayed in the centre of the footer.
All these default headers and footers can be customised, either with the facilities already provided by the memoir class, or via the fancyhdr package. Basically, you need to redefine the “plain” pagestyle for chapter pages, and the “headings” pagestyle for the non-chapter pages. Using memoir, you’d do something like
\makeevenhead{plain}{left}{centre}{right}
\makeoddhead{plain}{left}{centre}{right}
\makeevenfoot{plain}{left}{centre}{right}
\makeoddfoot{plain}{left}{centre}{right}
\makeoddhead{plain}{left}{centre}{right}
\makeevenfoot{plain}{left}{centre}{right}
\makeoddfoot{plain}{left}{centre}{right}
% respectively \makeevenhead{headings}…
While if you’re using the fancyhdr package:
\fancypagestyle{plain}{
%% Clear all headers and footers
\fancyhf{}
%% e.g. if right footers on odd pages and left footers
%% on even pages are some content:
\fancyfoot[RO,LE]{…}
%% this applies to right headers on odd pages:
\fancyhead[RO]{…}
%% and this to left headers on even pages:
\fancyhead[LE]{…}
%% and this to centre headers on both even and odd:
\fancyhead[C]{…}
}
\fancypagestyle{headings}{…}
As always, see the respective manuals/user guides for extensive instructions.
Here are some examples of what I’ve done:
(Download links of the .tex source files are at the end of this post)
Here are my specs:
- On chapter pages:
- page number in a coloured box on the right in the footer on odd pages;
- ditto, but on the left in the footer on even pages;
- blank running headers.
- On non-chapter pages:
- same footers as above;
- on even pages, the chapter title on the left in the header, and a decorative line extending to the right all the way to the paper margin;
- on odd pages, the section title on the right in the header, and a decorative line extending to the left all the way to the paper margin.
I used the tikz package for the coloured box containing the page number, as well as the decorative lines in the header.
You’ll probably notice that on the non-chapter pages, I’ve got some coloured background going on, too. I could’ve used the wallpaper package to achieve this effect, but just for kicks, I did them using the tikz package, using the headings pagestyle as a hook.
So here are the .tex source (plus the public domain images used) for producing the sample pages above:
Note that my examples require wallpaper.sty v2.5. If you’re using MikTeX, your wallpaper.sty is most likely v2.4, so you’ll have to grab the latest version yourself.
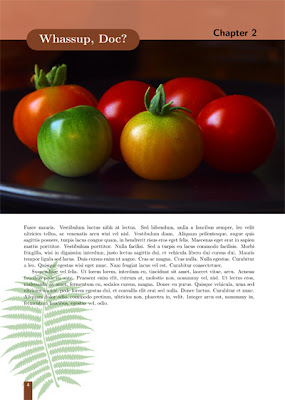
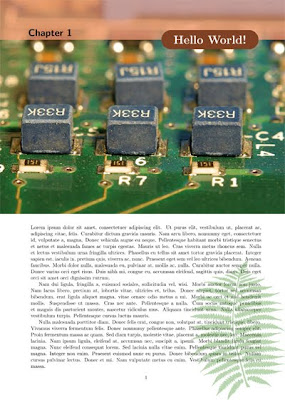
Fancy Chapter Headings
This is the 3rd post in the bookdesign series. Previous posts in this series:
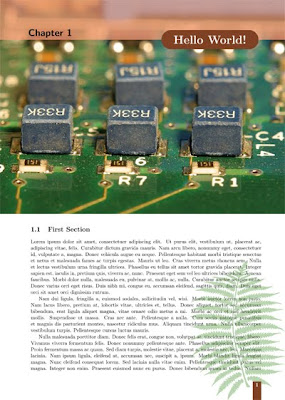
If you look at my post that started this series, you might notice that the first page of every chapter in the Grid Computing Cluster report is rather fancy. I’ve initially got my inspirations from Stefan Kottwitz’s post on ‘Fancy chapter headings with TikZ‘.
Here are the samples of how the chapter pages would look like:

(Download links of the .tex source files are at the end of this post)
The chapter number and title are rendered with TikZ, similar to what’s described in Stefan Kottwitz’s post. I threw in a background image across the top of the page, and another one at the lower corner, using the wallpaper package.
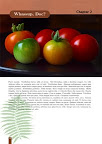
Just so we can choose a different image for every chapter, I defined a new command that holds the image filename (\newcommand\chapterillustration{}) and re-define it at each chapter (\renewcommand\chapterillustration{cherry-tomatos}).
Notice that the positioning of the chapter title and the fern leaf background image is different depending on whether the chapter starts on an odd or even page. The memoir document class provides the commands \checkoddpage and \ifoddpage…\else\…\fi, so that you can define what to do in each case. Don’t worry if you’re not using the memoir document class, these commands are also available via the changepage package.
Now to actually implement these definitions. The memoir document class lets you define chapter styles (e.g. \makechapterstyle{FancyChap}{\def\printchaptertitle##1{…}} see the manual on “Chapter Headings” for more details) in the preamble, which you would activate in the document body with \chapterstyle{FancyChap}.
On the other hand, if you’re not using the memoir document class, use the \titleformat and \titlespacing commands from the titlesec package instead.
Sorry I’m too tired to even post relevant snippets; here are the links to the .tex sources to produce the sample pages above. I’ve incorporated the code for Changing page size and sizes, too. (By the way I used the lipsum package to generate the dummy text. You know, Lorem ipsum dolor sit amet…)
The sample public domain images are from here (cherry tomatos), here (computer chips) and here (fern leaf).
Using Colours in LaTeX
A brief departure from the bookdesign series, as some of my future posts within and outside the series will be dealing with the use of colours, so I might as well get it out of the way first. Summarily, we’ll take a look at how to use colours in LaTeX with the xcolor package. This will work with all outputs, i.e. .dvi, .ps and .pdf.
The most useful commands for applying colours made available by xcolor are:
- \color{color} (applies color to the text in the currrent group)
- \textcolor{color}{text} (applies color to the specified text only)
- \pagecolor{color} (colors the entire page to be color)
- \colorbox{color}{text} (creates a box containing the specified text, with color as the background)
- \fcolorbox{frame color}{bg color}{text} (same as above, but with a coloured border around the box)
See Section 2.6 of the xcolor manual for full list and more details of commands for colour application. Alternatively, if you’re using emacs, you can look it up with M-x list-colors-display.
The xcolor package has quite a collection of pre-defined colours; they are listed in Section 4 Colors by Name in the manual. Apart from the 19 “base” colours that are always available, you can also access more pre-defined colours via the dvipsnames, svgnames and x11names options. Here’s a quick example:
\documentclass[a6paper,12pt]{article}
\usepackage[x11names]{xcolor}
\usepackage[x11names]{xcolor}
\begin{document}
% ‘LemonChiffon1’ from x11names
\pagecolor{LemonChiffon1}
% ‘magenta’ is a base colour
\textcolor{magenta}{Hello World!}
% ‘CadeBlue1’, ‘Firebrick2’ and ‘Goldenrod1’
% are available via x11names
What a \colorbox{CadetBlue1}{wonderful}
\fcolorbox{Firebrick2}{Goldenrod1}{world}.
\end{document}
You can mix up your own colours, too. \color{LemonChiffon1!80} means 80% LemonChiffon1 and 20% white, while \color{lime!30!yellow!60!Mahogany} would be 30% lime, 60% yellow, and 10% Mahogany. You can also give names to the colours you concoct, so that you can reuse them at various points in your document. For example:
- \definecolor[named]{CoolBlack}{cmyk}{.3,0,0,1} defines the CMYK ‘Cool Black’ (useful if your printer asks for CMYK black instead of ‘rich black’)
- \definecolor[named]{AquaBlue2}{rgb}{.553,.769,.98} defines ‘AquaBlue2’ with decimal RGB values (range [0,1])
- \definecolor[named]{Hazelnut}{HTML}{BDA59B} defines ‘Hazelnut’ with HTML RGB values. Useful if you’re re-using colour definitions from CSS styesheets.
If you’re like me i.e. you just can’t hit the right figures to get a colour just right, head over to COLOURlovers for lotsa inspirations and colour schemes. I got almost all my colours for the Grid Computing Cluster report from this website.
Have fun and happy LaTeXing!