CJK support in LaTeX

(Oh gosh. This is one post I should have written a loooong time ago.)

Najmi has previous posted about Jawi support on LaTeX. Well then, what about CJK (Chinese, Japanese, Korean) characters?

(The process may be simpler using XƎLaTeX, but I personally use LaTeX more, so this post won’t touch on XƎLaTeX.)

Short snippets

If you need only short CJK snippets, use the CJK package. (While you’re at it, you may as well grab cjk-fonts and wadalab for the fonts.) On Debian-based systems, just grab latex-cjk-all and you should be good. Or if you don’t want the whole package (it’s huge), grab whatever you need for latex-cjk-chinese, latex-cjk-japanese or latex-cjk-korean (and whatever relevant font packages).

Here’s a basic example for Chinese:

\usepackage{CJK}

%% if your file is saved as GB simplified encoding
… as we say in Chinese,
\begin{CJK}{GB}{gbsn}子曰:有朋自远方来,不亦乐乎?\end{CJK}

%% if you file is saved as Big5 traditional encoding
… as we say in Chinese,
\begin{CJK}{Bg5}{bsmi}子曰:有朋自遠方來,不亦樂乎?\end{CJK}

But if you’re saving as UTF-8 then you need CJKutf8.sty (included in CJK package):

\usepackage{CJKutf8}

as we say in Chinese,
\begin{CJK}{UTF8}{gbsn}子曰:有朋自远方来,不亦乐乎?\end{CJK}
or \begin{CJK}{UTF8}{bsmi}子曰:有朋自遠方來,不亦樂乎?\end{CJK}

You have a few font choices (make sure you get the latex-cjk-chinese-arphic-* files!)

  • gbsn (简体宋体, simplified Chinese)
  • gkai (简体楷体, simplified Chinese )
  • bsmi (繁体细上海宋体, traditional Chinese)
  • bkai (繁体标楷体, traditional Chinese)

Japanese and Korean text are typeset much the same way. If you save everything as UTF-8, then it’s just a matter of knowing what fonts to invoke:

\usepackage{CJKutf8}

%% Japanese
\begin{CJK}{UTF8}{min}
露の世は 露の世ながら さりながら
\end{CJK}

%% Korean
\begin{CJK}{UTF8}{mj}
편편황조 자웅상의 염아지독 수기여귀
\end{CJK}

The Japanese fonts are from the wadalab packages (latex-cjk-japanese-wadalab-*):

  • min (明朝 Mincho)
  • goth (ゴシック Gothic)
  • maru (丸ゴシック Maru Gothic)

As for Korean, well I’ve only been able to get mj (明朝体 MyongJu) working so far.

Entire Document in Chinese

On the other hand, if your entire document is going to be in Chinese, you might be better off using the ctexart document class (in the ctex package):

\documentclass[UTF8]{ctexart}

\begin{document}

\section{论语}
子曰:有朋自远方来,不亦乐乎?

\end{document}

There is a caveat, though. You’ll need to copy some Windows Chinese font files to your $localtexmf/fonts/truetype/… directory (don’t forget to run texhash!) to use ctex properly (font name in CJK/ctexart in brackets). These are all for simplified Chinese characters:

  • simsun.ttc 宋体 (song, default)
  • simfant.ttf 仿宋 (fs)
  • simkai.ttf 楷书 (kai)
  • simhei.ttf 黑体 (hei)
  • simli.ttf 隶书 (li)
  • simyou.ttf 幼圆 (you)

In any case, for more help on the ctex package and ctexart.cls, you’d best ask for help at the CTEX forum. (Language there is predominantly Mandarin Chinese.) I’m not aware of similar classes for Japanese nor Korean, though.

Pinyin and Ruby

Younger children learning Chinese characters (Hanzi/Kanji/Hanja) would often have the pronunciations annotated alongside/above/beneath the characters. For Chinese pinyin pronunciations, you would invoke

\usepackage{pinyin}
…\dian4 \deng1

to get diàn dēng.

To cite Martin Duerst:

Ruby are small characters used for annotations of a text, at the right side for vertical text, and atop for horizontal text, to indicate the reading (pronounciation) of ideographic characters.

And you can produce them with the ruby package:

\usepackage{CJKutf8,pinyin}
\usepackage[overlap,CJK]{ruby}

%% By convention, the pinyin would be *under* the Hanzi
%% so change the \rubysep to move it under

\begin{CJK}{UTF8}{gbsn}
\renewcommand\rubysep{-1.4em}
\ruby{电}{\dian4}\ruby{灯}{\deng1}
\end{CJK}

%% I find the default \rubysep (-0.5ex) too tight, so
%% let’s enlarge it a little.

\renewcommand\rubysep{-0.2ex}

%% Shonen manga readers would get the written as
%% rival, pronounced as friend
 reference

%% (CORRECTED June 22)
\begin{CJK}{UTF8}{min}
\ruby{素敵}{ともだち}
\end{CJK}

%% Disclaimer: I’m actually unsure where the
ruby should be placed for Korean Hanja

\begin{CJK}{UTF8}{mj}
\ruby{南}{남}\ruby{宮}{궁}
\end{CJK}

The output of which looks something like this:

Diagramming Applications

This post answers the question

So how do I create high-resolution line drawings for use in LaTeX? Journal publishers request PDF or EPS with at least 800dpi.

Najmi’s post on Drawing diagram; the cryptic way covered tikz, ditaa and graphviz. (I myself swear by tikz.) However these may be too geeky for most people’s tastes. So here’s a list of free, open source, GUI-based diagramming applications that can produce PDF or EPS files.

  • OpenOffice Draw is a diagramming/drawing program that can save to PDF format. It’ a part of the OpenOffice suite. Personally I find it a bit clunky, but if you already have OpenOffice and don’t want to install new programs, it’ a good choice. Available on Linux and Windows. Mac users should look for NeoOffice instead.
  • Dia is an old favorite among Linux users, but some people might think it looks a bit rough. It does a very good job, though, with lots of elements and icons for UML diagrams, networking diagrams, ciruits, etc, etc etc. Dia supports saving to EPS files, and is available for Linux, Windows and Mac.
  • yEd. You know, I actually like yEd. A lot. The interface is easy to use, and there are also elements for UML, “people”, machines and more — in colour. (There’s even an iPod icon!) The output it produces does look more modern and polished then Dia. yEd supports saving to SVG, EPS and PDF, and is available on Linux, Windows and Mac.

Migrating to LaTeX: Producing High-resolution Line Drawings

Recently I was asked this question by not 1, but 3 people, so I guess that makes for a valid blog post!

I’m now migrating my paper/presentation to LaTeX from Microsoft Word/Powerpoint. It feels great! But is there any way I can transfer my existing line drawings over as high-resolution PDF or EPS? The publisher is asking for 800-1200 dpi.

Of course you can. I’ll outline what has worked for me below.

As for the question

So how do I create high-resolution line drawings for use in LaTeX if not the drawing tools in Word?

See the posts on Diagramming Applications and Drawing diagram; the cryptic way instead.

Mac OS X 10.5 Preview

If you’re on a Mac, first print your drawing diagram as a PDF. Open the PDF in Preview. Click the Select button on the Toolbar, and draw a rectangle around your drawing diagram. Then go to Tools menu and select Crop, or just hit Command-K. Save your cropped drawing back as a PDF.

OpenOffice Draw

If you have OpenOffice, you can try copying-and-pasting your drawing objects over to OpenOffice Draw, change the page size (Format > Page…) to fit the drawing just right, then export the drawing to PDF. However, elements and formattings often get distorted when copied over to OODraw, so personally I’d go for the procedures described next.

PDF Freeware Tools

Disclaimer: The tools described in this section are mainly for use in Windows, and are free-of-charge, but not all are open source.
Big thanks to Kevin Klement for pointing me toward PDFCreator and BRISS, true FOSS solutions!

Convert Your Drawing to PDF
First get PDFCreator. Once installed, you will be able to produce PDF out of any documents that is printable.

In your Word or Powerpoint document, select/highlight your line drawing, and go to File > Print. Choose “PDFCreator” as your printer, and select “Selection” or (“Current Page”) as the page range. You should also open the Print Properties, click on the Advanced button, and make sure that Print Quality is set to a sufficiently high dpi (e.g. 1200).

Click OK to print, and you will be prompted to enter any metadata (author, title, etc) you would like about the PDF. Save the PDF. You now have a high-resolution line drawing PDF, but it needs to be cropped to remove the surrounding white space.

First, install PDF995. You’ll need the 2 files from Pdf995 2-Step Download, i.e. the “Printer Driver” and the “Free Converter”. (A warning though: PDF995 is adware.)

In your Word or Powerpoint document, select/highlight your line drawing, and go to File > Print. Choose “PDF995” as your printer, and select “Selection” as the page range.

When you click OK you will be asked to enter a file name to save your PDF to. Bear with the annoying advertisement that pops up for 10 seconds.

Cropping Your PDF
You have a few choices.

  • Photoshop. If you’re one of the lucky souls to have a copy of Photoshop, you can use it to do the job. Just remember to set the Resolution to 800 or 1200 when you open the PDF in Photoshop. Crop, and then save the file back as PDF.
  • GIMP. But chances are that you don’t have Photoshop. GIMP can also open PDF files, and you’ll also be able to specify a sufficiently high resolution when you open it and then crop it. However, while GIMP can save it as an EPS (fine if that’s what you need), it cannot save/export to PDF format. And GIMP rasterises the file before saving (as Kevin pointed out), which defeats the purpose, really. So the winner really goes to…
  • BRISS, which needs a JRE to run. Unzip the BRISS zip file, and double-click on briss-.jar to launch. Load your diagram drawing PDF file, and draw a rectangle around the drawing objects. Click Crop PDF, and you’re done after saving the file.
  • PDF-cropper. You will need .NET 3.5 and GhostScript, so download and install those first before installing PDF-cropper.

    (Theoretically, you can use the GhostScript on command line to crop your PDF, but that involves figuring out the crop box and margins yourself, which I suspect not many people enjoy. Hence PDF-copper.)

    In PDF-cropper, go to the Configure menu and set the path to GhostScript binaries (usually C:\Program Files\GS\GS8.6x\bin), as well as your fixed output folder. Now load all your PDF files containing your drawings (PDF-cropper processes them by batch.) You can choose to crop off all surrounding white space around your drawings, or leave 5mm or 10mm space around them. Click the Action button, and the automatically cropped PDFs will be saved in the fixed output folder you specified.

Congratulations, you should now have high-resolution line drawings in PDF (or EPS) format, that are suitable for journal publication. Now just to include them in your LaTeX file with \includegraphics[width=...]{filename}.

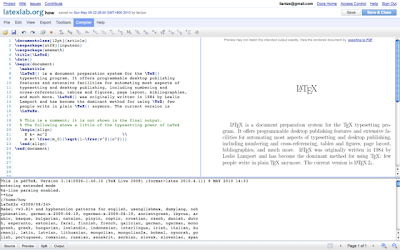
LaTeX Lab, a web-based (collaborative) LaTeX editor

LaTeX Lab is a web-based LaTeX, using Google Docs as its platform so you’ll need a Google login to try it out. Since “sharing” a document is a default feature in Google Docs, LaTeX Lab can be used as an online collaborative editor.

Once saved, your LaTeX file will show up in your Google Docs file list, but you must access open it again via the LaTeX Lab link to get the LaTeX editor GUI. Opening the file from Google Docs will just show it as a plain text file, without the LaTeX syntax highlighting and toolbars etc.

However it’s still a preview release, so you probably don’t want to depend on it for your day-to-day use just yet!

Creating book cover with PSTricks


I don’t know, maybe since was triggered by Lian’s post, I decided to try creating my book cover as well. I always wanted to write some books since I think always need of extra money hehe. Note that the example above is using wallpapers from an open source project, while the following bird is from my own photo collections.

The following codes actually were modified from here [PDF] . At first I thought by modifying few stuffs I can straight away used to code.. but maybe because of different configuration that I have (I’m using Ubuntu 9.04 with the default TexLive).. I met several issues. I’m using pdflatex by the way.. perhaps that caused the problem.

\documentclass[12pt]{article}
% load the necessary packages
\usepackage[paperheight=9in,paperwidth=13.24in,margin=0in]{geometry}
\usepackage[dvipsnames,prologue,table]{pstricks}
\usepackage{pst-all}
\usepackage{graphicx}
\usepackage{lipsum}
\usepackage{rotating}
\usepackage{color}
\usepackage[ISBN=978-80-85955-35-4]{ean13isbn}
%\EANisbn[SC4]
% begin the document and suppress page numbers
\begin{document}
\pagecolor{Maroon}
\pagestyle{empty}
% create the box with the front cover picture
\newsavebox\IBox
\sbox\IBox{\includegraphics[height=9in]{itik2.png}}
% set up the picture environment
\psset{unit=1in}
\begin{pspicture}(13.24in,9in)
% set up the fonts we use
\DeclareFixedFont{\PT}{T1}{ppl}{b}{it}{0.5in}
\DeclareFixedFont{\PTsmall}{T1}{ppl}{b}{it}{0.4in}
\DeclareFixedFont{\PTsmallest}{T1}{ppl}{b}{it}{0.3in}
\DeclareFixedFont{\PTtext}{T1}{ppl}{b}{it}{11pt}
\DeclareFixedFont{\Logo}{T1}{pbk}{m}{n}{0.3in}
% place the front cover picture
\rput[lb](7.24,0){\usebox\IBox}
% put the text on the front cover
\rput[lb](8,7){\PTsmall \color{white}{Anak Itik yang Sombong}}
\rput[lb](8.94,6.5){\PTsmallest \color{white}{Najmi Zabidi}}
\rput[lb](9.04,0.8){\PTsmallest \color{white}{Fesbuk Press}}
% put the text on the spine (note the rotation over 270 degrees)
%\rput[b](6.62,8,0.75){\PTsmallest \color{black}

\rput[b](6.62,3,0.75)
{
\begin{turn} {-90}
{
\PTsmallest \color{white}Anak Itik yang Sombong
}
\end{turn}
}

% put the publisher’s logo on the spine
\rput[b](6.62,0.75){\color{white}{\fbox{\Logo FP}}}
% Create a Box containing the text for the back cover
\newsavebox\Blurbbox
\sbox\Blurbbox{\begin{minipage}{4.5in}
\textcolor{white}{\lipsum[1]}
\end{minipage}}
% And position the box
\rput[tl](1,8){\usebox\Blurbbox}
% Then we close all open environments

%%%%%%%%%%%%%%%%%%%%%%%%%%%%%%%%%%5

\newsavebox\Authorbox
\sbox\Authorbox{\includegraphics[width=.75in]{najmi-pass.png}}
%\psframe[fillstyle=solid,fillcolor=white](1,4)(1.7,4.95)
% now place the picture
\rput[lb](1.1,4.1){\usebox\Authorbox}
% create a savebx for the biography. The width has been adjusted so
% that the right margin matches with that of the book blurb
\newsavebox\Biobox
\sbox\Biobox{\begin{minipage}{3.6in}
\textcolor{white}{Najmi Zabidi is toying around with \LaTeX{}. Contact him
by at bla@bla.com}
\end{minipage}}
% and put it where it belongs
\rput[tl](1.9,4.95){\usebox\Biobox}

\rput(4.5,1.2){
\colorbox{white}{\EANisbn[SC1]}}

\rput[lb](1,1.2){\color{white}{\fbox{\Logo FP}{\PTsmallest { Fesbuk Press}}}}
\rput[lb](1,1){\PTtext \color{white}{Kuala Lumpur — MY}}
\rput[lb](1,0.8){\PTtext \color{white}{http://www.latex-my.blogspot.com}}
\end{pspicture}

\end{document}

Shameless Barcode Ads

\documentclass{article}

\usepackage{fancyhdr}
\usepackage{soul}
% Font für Code 39
\font\xlix=wlc39 scaled 1200
\newcommand{\barcode}[1]{{\xlix@#1@}}

\pagestyle{fancy}
\renewcommand{\headrulewidth}{0.4pt}

\rhead{\begin{tabular}{ll|ll}
\multicolumn{2}{c|}{\barcode{0193870980}} & \multicolumn{2}{c}{\barcode{0361965666}} \\
\textsc{\textbf{\sc{{{\so{ Muhammad}}}}}} & \so{019$\;$3870980} & \textsc{\textbf{\sc{{{\so{Najmi}}}}}} &\so{03$\;$61965666}
\end{tabular}}

\begin{document}

\centering{\ul{Cheap}\so { \LaTeX{} trainer for hire, at risk}}\\
\centering{\texttt{\small{najmi.zabidi@gmail.com}}}
\end{document}

Code was modified from somebody else on the web, I don’t remember the link. I invoke the soul package for space between characters.

LaTeX Documentation in Malay language

Hello,

I am gradually writing for a booklet for LaTeX in Malay language. If you also want to contribute, you’re welcome. Lian and some other friends also had contributed on comments and others stuffs.

Feel free to download:

PDF

Note that I don’t use version number for the PDF as of now, since I assume it’s a BETA for every time I commit. But it’s readable and hopefully beneficial.

Or, if you’re cool enough, download the .tex files and the rest by yourselves and compile it. I have created a script called Make, just chmod +x and ./Make

hg clone https://latex-my-docs.googlecode.com/hg/ latex-my-docs

Using the TeX FAQ

The (English language) TeX FAQ is a real treasure trove, maintained by the amazing Robin Fairbairns, who also co-maintains CTAN. (Yep, that repository of all contributed TeX & friends packages!!)

I would say 80% of the time, a LaTeX user can find a solution or pointers to a question in the FAQ, so the next time you’re tempted to hack your own solution or is frustrated by all the old, obsolete advices churned up by Google, try searching in the TeX FAQ first.

In fact, you might even have a local copy on your LaTeX installation. Here’s how to access them:

  • On TeXLive, run texdoc faq-en at the CLI.
  • On MiKTeX, run mthelp –view faq-en at a DOS prompt, or in the Windows Start → Run dialog.

Another alternative is via the Visual FAQ. Run texdoc visualfaq (or mthelp –view visualfaq). Browse through the PDF and click on an element which effect you’re trying to replicate; you will be directed to the relevant entry in the online TeX FAQ.