Fancy Chapter Headings

This is the 3rd post in the bookdesign series. Previous posts in this series:

If you look at my post that started this series, you might notice that the first page of every chapter in the Grid Computing Cluster report is rather fancy. I’ve initially got my inspirations from Stefan Kottwitz’s post on ‘Fancy chapter headings with TikZ‘.

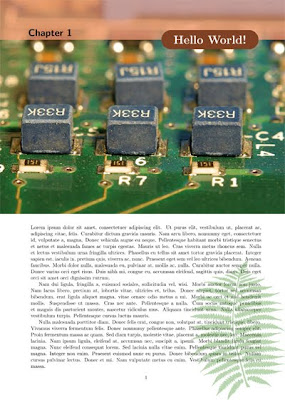
Here are the samples of how the chapter pages would look like:

(Download links of the .tex source files are at the end of this post)

The chapter number and title are rendered with TikZ, similar to what’s described in Stefan Kottwitz’s post. I threw in a background image across the top of the page, and another one at the lower corner, using the wallpaper package.

Just so we can choose a different image for every chapter, I defined a new command that holds the image filename (\newcommand\chapterillustration{}) and re-define it at each chapter (\renewcommand\chapterillustration{cherry-tomatos}).

Notice that the positioning of the chapter title and the fern leaf background image is different depending on whether the chapter starts on an odd or even page. The memoir document class provides the commands \checkoddpage and \ifoddpage…\else\…\fi, so that you can define what to do in each case.  Don’t worry if you’re not using the memoir document class, these commands are also available via the changepage package.

Now to actually implement these definitions. The memoir document class lets you define chapter styles (e.g. \makechapterstyle{FancyChap}{\def\printchaptertitle##1{…}} see the manual on “Chapter Headings” for more details) in the preamble, which you would activate in the document body with \chapterstyle{FancyChap}.

On the other hand, if you’re not using the memoir document class, use the \titleformat and \titlespacing commands from the titlesec package instead.

Sorry I’m too tired to even post relevant snippets; here are the links to the .tex sources to produce the sample pages above. I’ve incorporated the code for Changing page size and sizes, too. (By the way I used the lipsum package to generate the dummy text. You know, Lorem ipsum dolor sit amet…)

The sample public domain images are from here (cherry tomatos), here (computer chips) and here (fern leaf).

Using Colours in LaTeX

A brief departure from the bookdesign series, as some of my future posts within and outside the series will be dealing with the use of colours, so I might as well get it out of the way first. Summarily, we’ll take a look at how to use colours in LaTeX with the xcolor package. This will work with all outputs, i.e. .dvi, .ps and .pdf.

The most useful commands for applying colours made available by xcolor are:

  • \color{color} (applies color to the text in the currrent group)
  • \textcolor{color}{text} (applies color to the specified text only)
  • \pagecolor{color} (colors the entire page to be color)
  • \colorbox{color}{text} (creates a box containing the specified text, with color as the background)
  • \fcolorbox{frame color}{bg color}{text} (same as above, but with a coloured border around the box)

See Section 2.6 of the xcolor manual for full list and more details of commands for colour application. Alternatively, if you’re using emacs, you can look it up with M-x list-colors-display.

The xcolor package has quite a collection of pre-defined colours; they are listed in Section 4 Colors by Name in the manual. Apart from the 19 “base” colours that are always available, you can also access more pre-defined colours via the dvipsnames, svgnames and x11names options. Here’s a quick example:

\documentclass[a6paper,12pt]{article}
\usepackage[x11names]{xcolor}

\begin{document}

% ‘LemonChiffon1’ from x11names
\pagecolor{LemonChiffon1}

% ‘magenta’ is a base colour
\textcolor{magenta}{Hello World!}

% ‘CadeBlue1’, ‘Firebrick2’ and ‘Goldenrod1’
% are available via x11names
What a \colorbox{CadetBlue1}{wonderful}
\fcolorbox{Firebrick2}{Goldenrod1}{world}.
\end{document}

You can mix up your own colours, too. \color{LemonChiffon1!80} means 80% LemonChiffon1 and 20% white, while \color{lime!30!yellow!60!Mahogany} would be 30% lime, 60% yellow, and 10% Mahogany. You can also give names to the colours you concoct, so that you can reuse them at various points in your document. For example:

  • \definecolor[named]{CoolBlack}{cmyk}{.3,0,0,1} defines the CMYK ‘Cool Black’ (useful if your printer asks for CMYK black instead of ‘rich black’)
  • \definecolor[named]{AquaBlue2}{rgb}{.553,.769,.98} defines ‘AquaBlue2’ with decimal RGB values (range [0,1])
  • \definecolor[named]{Hazelnut}{HTML}{BDA59B} defines ‘Hazelnut’ with HTML RGB values. Useful if you’re re-using colour definitions from CSS styesheets.

If you’re like me i.e. you just can’t hit the right figures to get a colour just right, head over to COLOURlovers for lotsa inspirations and colour schemes. I got almost all my colours for the Grid Computing Cluster report from this website.

Have fun and happy LaTeXing!

Setting page size and margins

There’s quite a bit of interest in the .tex code behind the Grid Computing Cluster report, but I think posting the raw code in its entirety would be a bit too overwhelming to quickly glean useful tips from it. (Also to avoid getting into any issues with my university… etc…)

So instead, I’ll be doing a series of short posts on how I achieved certain effects and book design, starting with this one. It’s probably faster for people to “zero-in” on what they need. 😉 Posts in this series will be tagged “book design”. But before you implement your next major book project with LaTeX, do check with your printing company about the printing process used. If you’ll be using on-demand laser printing, everything should go fine since the RGB colour model of your PDF should be adequate. However, if you’re going with offset printing, your printing company will most likely prefer CMYK colour model to be used instead, and I haven’t quite figured out how to tweak that perfectly with (pdf)LaTeX. In our case, only the book cover was printed with offset printing, and the effect was acceptable — so that ended well…

IMPORTANT DISCLAIMER: I am NOT a graphics designer, so my choice of colours/illustrations/etc probably sucks. Don’t shoot me. 🙂

Now there are multiple ways to achieve the same effect in LaTeX (that’s FOSS for you). For this report, I’ve decided to use the memoir document class, which incorporates the functionalities of many other packages. (Do take some time to browse or search through the excellent manual with texdoc or mthelp.)

The flowfram package looks like a very interesting solution for designing dynamic layout, but I didn’t find out about it until too late into my own project. Do find some time to look at it yourself. If you want to go with the standard document classes (report, book) or the koma-script classes, I’ll indicate what extra packages you’ll need where relevant.

In this first post we’ll just look at how (custom) page sizes and margins can be specified. Basically my page design is:

  • Stock paper size is 303mm x 216mm. The stock paper is the raw original paper that a commercial printer will print the page on, which will be trimmed down to the page size
  • Page size is A4 i.e. 297mm x 210mm.
  • The printer advised us to leave a good 10mm from the page edges around any printed text.
  • I decided the main typeblock will be 20mm from the top, bottom and spine (inner) edge of the page, and 15mm from the outer edge.
  • Also, the running header should occupy the height of a line of text, 7mm from the top edge of the typeblock. Whereas the baseline of the running footer is 7mm from the bottom edge of the typeblock.

These are not necessarily good measurements for an aesthetically-pleasing book design, but more because I was trying to strike a balance between aesthetics and to fit everything in (Lesson: Get in touch with the printing company early to check with their printing specifications per minimum page margins, etc!)

These can be implemented using commands from the memoir class. (The notion of ‘stock’, although a common concept in publishing and printing industries, is only available in memoir, not in the standard document classes.)

\documentclass[twoside]{memoir}

%% The stock paper size
\setstocksize{303mm}{216mm}

%% The ‘real’ page size
\settrimmedsize{297mm}{210mm}{*}

%% The stock paper will be trimmed 3mm from the
%% top edge and 3mm from the left edge

\settrims{3mm}{3mm}

%% Spine and trim page margins from main typeblock
\setlrmarginsandblock{20mm}{15mm}{*}

%% Top and bottom page margins from main typeblock
\setulmarginsandblock{20mm}{20mm}{*}

%% Header occupies height of a single line;
%% Bottom edge of footer is 7mm from bottom edge
%% of typeblock

\setheadfoot{\baselineskip}{7mm}

%% Bottom edge of header is 7mm from top edge of
%% typeblock

\setlength\headsep{7mm}

%% Apply and enforce layout
\checkandfixthelayout

In my case, due to some later issues with colouring the 3mm bleeding edges too (as per our printing company’s request), I decided to make the trimmed page size the same as my stock size and increased the page margins instead:

\documentclass[twoside]{memoir}

%% Custom stock paper and page size
\setstocksize{303mm}{216mm}
\settrimmedsize{\stockheight}{\stockwidth}{*}

%% Adjust margins accordingly to achieve
%% same previous layout

\setlrmarginsandblock{23mm}{18mm}{*}
\setulmarginsandblock{23mm}{23mm}{*}

\setheadfoot{\baselineskip}{7mm}
\setlength\headsep{7mm}

\checkandfixthelayout

If you just need to print on exactly A4-sized paper, you can forget about setting the stock and trimmed size explicitly and just do

\documentclass[a4paper,twoside]{memoir}

\setlrmarginsandblock…
\setulmarginsandblock…

\checkandfixthelayout

One last thing: if you’re not using the memoir class, you can still change the page margins via a high-level interface with the geometry package:

\documentclass{article}
\usepackage{geometry}
\geometry{
   paperwidth=216mm, paperheight=303mm,
   left=23mm,  %% or inner=23mm
   right=18mm, %% or outer=18mm
   top=23mm, bottom=23mm,
   headheight=\baselineskip,
   headsep=7mm,
   footskip=7mm
}

Again, if you’re just going to print on A4 (or letter) paper, you can just do

\usepackage[a4paper]{geometry}
\geometry{
   left=20mm,  %% or inner=20mm
   right=15mm, %% or outer=15mm
   top=20mm, bottom=20mm,
   headheight=\baselineskip,
   headsep=7mm,
   footskip=7mm
}

i.e. just pass the a4paper option to the geometry package; there’s then no need to set the paper height and width explicitly.
Unfolding vim-latex fold

I don’t know about you guys but I found it is very annoying to have my sections and subsections to be folded in vim/gvim , since somehow I mistakenly put “i” since I want to change to insert mode to unfold (although it should be :za) .

So now, the cruelest method is by

:set foldlevel = 5

usually I put 10 heh.

(since section,subsection and subsubsection may =3 .. so play safe with above that level).

But so far I did not managed to get it work by putting in in $HOME/.vimrc . Any hints?

KDE Beamer Themes

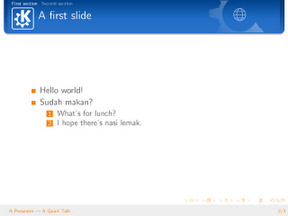
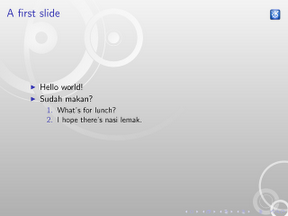
FOSS.my is this Friday, and even though I can’t attend, perhaps there are some presenters who’d be interested to use Beamer to prepare their presentations, and perhaps using KDE themes: you can download the theme packages (.sty and .png files) from that link there. Once downloaded, put them in your TEXMF tree (~/texmf/tex/latex on TeXLive and MikTeX, ~/Library/texmf/tex/latex on MacTeX), and refresh it (use the MikTeX control panel; or run texhash if you’re using TeXLive. If using MacTeX, you won’t need to manually run texhash or anything).

By the way, you’ll find templates for OOImpress and KPresenter via that link, too.

To use the Oxygen-style theme:

\documentclass{beamer}
\usetheme{oxygen}

\begin{document}
\begin{frame}

\end{frame}

\end{document}

Sample output:

To use the Air theme and the output:

\documentclass{beamer}
\usetheme{air}

There’s also a PNG image which can be used as background for presentations at the link above (desenho.png). To use this with the default beamer theme, do:

\documentclass{beamer}
\setbeamertemplate{background}{\includegraphics[width=\paperwidth,height=\paperheight]{desenho}}

Happy LaTeXing!

Background images

I’m sure every LaTeX user tried this code at least once to add a “background image” on a page:

\includegraphics[width=\pagewidth,height=\textwidth]{wallpaper_filename}

But the included graphics, even though it looks the right size, would refuse to budge beyond the page margins, leaving a white border all round it. And you’d probably have problem placing any text at all on the graphics, thus defeating the purpose of a “background” image.

The wallpaper package offers an easy way to add background images or wallpapers in LaTeX, including tiling. The following commands are available:

  • \CenterWallPaper{}{} where is a value between 0 and 1, for specifying the fraction of paper width or height. The aspect ratio of the graphics will not be changed, i.e. you won’t get a “stretched” wallpaper as you would with your desktop wallpapers.
  • \ULCornerWallPaper{}{}
  • \LLCornerWallPaper{}{}
  • \URCornerWallPaper{}{}
  • \LRCornerWallPaper{}{}
The above four commands take the same arguments as \CenterWallPaper, but puts the image at the Upper Left, Lower Left, Upper Right and Lower Right corners of the page respectively.

For tiling wallpapers, there are:

  • \TileWallPaper{}{}{}, where you can specify (in pt, cm, in…) the width and height of the included image.
  • \TileSquareWallPaper{}{}, where the included image would be re-shaped as a square, and is the number of “image tiles” that will fill up the width of the paper.

Note that all the commands above will apply the background images on every page after the command is issued. To clear the wallpaper, use \ClearWallPaper.

Also, for each command \XXXWallPaper command above, there is a \ThisXXXWallPaper command that takes the same arguments but would apply the background image on only the current page.

You can now run wild with your imagination to design letterheads, chapter headings, covers, etc. Have fun!

Name that symbol!

If you wanted to insert some symbol in a word processing application, you’d probably open up a character palette or symbol map, and browse through various fonts (wingdings, dingbats…) to find that elusive symbol.

In LaTeX, the Comprehensive LaTeX Symbol List has just about every symbol imaginable in LaTeX, from mathematical operators and symbols (including Greek letters), the Euro symbol, wingdings, dingbats, blah blah blah. The list is accessible as a PDF on your local installation via the commands texdoc comprehensive on TeXLive, or mthelp –view comprehensive on MikTeX.

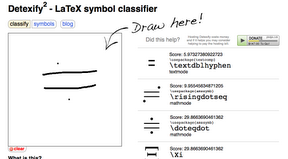
However, browsing through the list is still rather tedious, even if the document has a good index to make searching a leeeeeetle bit easier. Detexify is a free online tool that greatly simplifies the hunt for a LaTeX symbols. You sketch your symbol with the mouse, and detexify tries to classify it and returns the appropriate LaTeX package and command required for rendering it.

Here’s an example of a “null” symbol. The 2nd symbol in the list is the one I’m looking for, so I’m going to include the lines

\usepackage{amssymb} $… \varnothing … $
in my .tex file.

Here’s another example of a maths symbol.

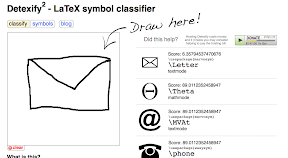
Wingdings and dingbats work, too. In fact, I haven’t even finished drawing the envelope, and detexify has already showed me \Letter from the marvosym package.

True or False: LaTeX can produce only boring, drab-looking stuff

I was asked to compile and produce a report for a research project to be published, with instructions to make it “look professional”, something like this report here.

I was too stupid to learn how to use PageMaker, Illustrator or FreeHand properly in a short time, so I jumped at LaTeX as  my tool. Well after all, the glossaries (or acronym) package kept the acronyms and abbreviations consistent, and biblatex (a new, experimental package that offers much more flexible citation and bibliography features) meant easy inclusion of list of publications anywhere in the report and without having to manually format the entries. The tikz package provides drawing capabilities which I used liberally all over the page designs. Heck, even adding a barcode for the ISBN was effortless with ean13isbn.

I reckon a few eyebrows were raised, and indeed the printing company expressed surprise when told that our PDF was prepared with LaTeX (“You mean LaTeX can produce colour stuff?”)

Without going into too much details on all the packages I used, here are some excerpt pages from the final product, designed and typeset by yours truly. While I’m certainly not a graphics designer by any means, and really professional layout designs is much more easily achievable with other applications mentioned earlier (if you know how to use them properly), I’m pretty happy with the end result. But never, ever let it be said that LaTeX is capable of producing drab, boring, black-and-white scholarly articles only again!


Accessing Package Documentations

LaTeX package authors are awesome, not only because they develop and maintain so many goodies for the convenience of other LaTeX users (especially those of us who aren’t that well-versed with TeX), but also because they fully document the usage of their packages. (Well most of them anyway.)

How do you access these documentations and manuals, though? Do you google (or search on CTAN) and download the manuals every time you want to look up the details of user commands in, say, the glossaries package? Occasionally, though, you may find that the manuals you just downloaded are the wrong versions for the package files installed on your system.

Chances are that the documentations are already installed on your system, when you first installed those packages. They’re usually located in $TEXMF/doc/tex/latex, or $TEXMF/doc/bibtex for BibTeX-related packages.

There’s an easier way to look up a package’s documentation than manually navigating the TEXMF trees, though. In TeXLive (that’s probably what you have if you’re on a *nix or Mac system), type

$ texdoc glossaries (or whatever package you’re interested in)

at the shell prompt. Voíla! The documentation for the glossaries package would open automatically for your perusal.

If the file that appears seem like an example file demonstrating a package’s functionalities and not the documentation proper, try

$ texdoc –list glossaries


instead. You’ll be presented with an interactive list from which you can select the file you want to open.

MikTeX users on Windows can use the command

mthelp glossaries

at the command prompt or from the “Start → Run” dialog instead. A browser window would open, listing possible documentation files associated with the package name you supplied. Click on a link to view the file you’re interested in. And if you trust the system enough to hit upon the “main” documentation file at the first try, use

mthelp –view glossaries

instead.

Menyimpan TeX fail sebagai Office readable

Bagi mereka yang menginginkan fail *.tex mereka boleh dibaca oleh pemprosesan kata seperti OpenOffice dan MS Word, tiada jalan mudah yang saya temui. Namun demikian, saya cuba berkongsi kaedah yang saya anggap less hassle berbanding dengan pengubahan langsung.

Caranya ialah;

*.tex —-> *.html —-> OpenOffice format —> *.doc

Kita senaraikan dulu tools yang digunakan selain cara yang saya sebutkan:

dan lain-lainnya yang mungkin tidak saya sebutkan di sini.

Buat masa ini, saya selesa dengan tth, disebabkan conversion yang saya buat menggunakan tools ini tidak memerlukan tuning yang banyak.

tth -e2 akan menghasilkan satu fail HTML yang mengandungi kandungan fail .tex tadi. Anda boleh rujuk manual tth untuk mengetahui opsyen yang digunakan.

Selepas ubah ke HTML, import dokumen HTML tadi menggunakan OpenOffice.org, dan Save As sebagai *.doc . Mungkin anda perlu betulkan sedikit sebanyak indentation, tetapi sebahagian besar teks, dan citation yang dihasilkan oleh BibTeX tetap boleh digunapakai